Physical security checklists help organizations implement rigor and consistency when assessing if their facilities, systems, personnel, and procedures will adequately secure vital assets. Checklists assist with audits, assessments, new facility evaluations, follow-up after incidents of possible loss or theft, and ongoing security evaluation through routine program reviews.
This article outlines the foundational elements essential for developing modern physical security checklists. It will also discuss how organizations can use checklist elements to evaluate risk related to building controls, access governance, surveillance readiness, device health, incident response, employee awareness, and continuous improvement.
Summary of key physical security checklist concepts
The table below summarizes the six key physical security checklist concepts that this article explores in detail.
| Concept | Description |
|---|---|
| Risk-based checklist design | A physical security checklist should reflect the organization's facility type, operating model, critical assets, business impact, compliance obligations, and actual threat environment. |
| Physical site and perimeter controls | Checklist reviews should evaluate how the facility layout, exterior areas, entry points, barriers, lighting, signage, parking, loading docks, and other physical controls help prevent or delay unauthorized access. |
| Access and monitoring readiness | A checklist should assess whether access permissions, visitor workflows, surveillance coverage, alarm handling, recording retention, and monitoring procedures support day-to-day security and incident visibility. |
| Security device health and lifecycle | Modern checklists should evaluate whether cameras, access panels, sensors, recorders, and other connected devices are inventoried, online, patched, securely configured, monitored, and managed through end-of-life or replacement. |
| Incident response and employee preparedness | Checklist reviews should test whether people, playbooks, escalation paths, emergency contacts, training, and reporting procedures are ready to support real incidents. |
| Remediation and continuous improvement | Checklist findings should be prioritized, assigned to owners, tracked to closure, and used to improve policies, budgets, vendor performance, compliance evidence, and long-term security planning. |
Risk-based checklist design
A physical security checklist is only useful if it accurately reflects the environment it will evaluate. A generic checklist may help teams remember common controls, but it can also create a false sense of security if it treats every facility, asset, and threat the same way. A checklist for a corporate office, for example, should not carry the same priorities as a checklist for a data center, warehouse, hospital, manufacturing plant, or school campus.
The first step in developing a risk-based checklist is to identify what is important to your business and why. Examples of asset types include: people, buildings, equipment, secured areas, operational systems, inventory, storage for electronic and paper documents, and other areas that could impact the effectiveness of safety, continuity, or compliance if compromised. After identifying the risks associated with your site, you can determine which items should be included on your checklist based on the risk factors specific to your site, rather than simply using a standard list of controls.
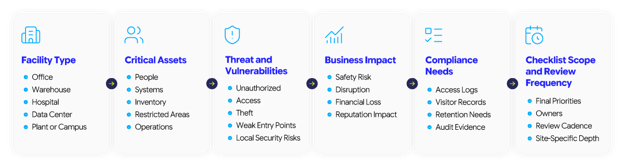
Risk-based physical security checklist design
Match the checklist scope to the facility type
Facilities can vary widely in the security concerns they raise. Facilities that are open to the public (like an office) should have a higher level of visitor management and lobby control than, say, a warehouse facility, where attention will need to be paid to the loading docks, vehicle access, inventory storage, and after-hours monitoring.
Because facilities have different operating needs, organizations should start with a baseline checklist and add site-specific items based on function, layout, occupancy, and risk profile.
A risk-based checklist should change depending on the type of facility being reviewed. While some baseline items, such as doors, visitor logs, access control, emergency contacts, cameras, and lighting, may apply across all locations, each site has different assets, operating conditions, public access levels, and business risks. The table below shows how checklist priorities can vary by facility type.
| Facility type | Checklist priorities |
|---|---|
| Corporate office | Visitor management, employee access, lobby controls, parking, emergency procedures, surveillance coverage |
| Warehouse or distribution center | Vehicle access, loading docks, inventory areas, perimeter controls, after-hours monitoring, delivery workflows |
| Healthcare facility | Public access, patient movement, restricted clinical areas, emergency access, staff awareness, visitor controls |
| Data center | Restricted zones, access authorization, surveillance, device uptime, power and environmental resilience, audit evidence |
| Manufacturing site | Perimeter access, contractor workflows, equipment areas, safety integration, incident response, critical operations |
Prioritize critical assets and high-risk areas
Not every area requires the same level of review. A reception area, parking lot, server room, executive office, storage room, lab, control room, or loading dock may each require a different checklist depth. The goal is to identify which areas would create the highest impact if unauthorized access, theft, tampering, disruption, or safety incidents occurred.
For example, a checklist may require a basic review of general office areas but a deeper review of restricted rooms, equipment spaces, or locations where sensitive materials are stored.
Consider business impact and compliance needs
Some physical security gaps may cause only minor inconveniences, while others may disrupt business operations, expose protected information, delay product development, jeopardize safety, or raise legal concerns. A checklist should help team members distinguish between lower-priority observations and those that require immediate attention.
The nature of compliance requirements may also dictate the checklist's content. For example, depending on the type of organization and its industry, a security department may be required to keep records of its processes related to access reviews, visitor logs, camera retention timeframes, incident records, device maintenance, and corrective action records.
Physical site and perimeter controls
Security teams assessing the physical security of a site should evaluate how personnel, vehicles, deliveries, and service providers approach the site, what point of entry they may have, and to what extent the site design helps stop or detect unauthorized movement onto the facility.
The physical security assessment must consider whether those controls function together to limit the number of weak entry routes and to direct or redirect traffic to the appropriate access points, whether they provide visibility into the area, and whether they secure sensitive areas, without negatively impacting the safety or the normal functioning of the facility.
Personal visits to the site are vital for collecting feedback from individuals who regularly utilize it (e.g., employees, facility teams, receptionists, security personnel, delivery coordinators, site supervisors). Employees can, through experience, determine alternatives to existing processes, identify points of congestion in task performance, and observe traffic patterns in and around the facility that may not be otherwise evident to the naked eye.
Evaluate the site from the outside in
A perimeter review should begin before entering the building. Security teams should look at how someone would approach the facility from parking areas, sidewalks, vehicle entrances, public roads, adjacent properties, and delivery points.
For example, a corporate office might rely heavily on a front lobby and employee badge access. At the same time, a warehouse would have many separate vehicle access points, such as vehicle gates, loading docks, yard areas, and shift-change entrances. A campus could be characterized as having open pedestrian access, while data centers and manufacturing facilities likely will have a more defined perimeter that provides greater physical isolation. Therefore, the aforementioned checklist should account for these variances and not presume that all facilities have the same exposure.
Common questions for a perimeter access management checklist include:
- Are perimeter boundaries clearly defined?
- Are visitors and vehicles directed to the correct entry points?
- Are pedestrian paths controlled and easy to understand?
- Do landscaping, fencing, or building placement create blind spots?
- Are approach routes visible enough to support deterrence and response?
A perimeter checklist should help teams review the site in layers, from the outer approach to building entry points and internal circulation paths. The table below shows common site and perimeter areas to evaluate, along with the types of issues a checklist should look for.
| Site or perimeter area | What the checklist should evaluate |
|---|---|
| Parking areas and approach routes | Unauthorized vehicle access, poor lighting, unclear pedestrian paths, hiding places, and proximity to sensitive areas |
| Fencing, gates, and barriers | Gaps, damage, uncontrolled openings, poor gate procedures, and whether barriers match the site's risk level |
| Exterior doors and emergency exits | Door condition, locking hardware, alarms, signage, inspection frequency, and safe emergency egress |
| Loading docks and service entrances | Separation from public areas, after-hours security, vendor access, open-door practices, and supervision |
| Windows, roof access, and utility areas | Unprotected secondary entry points, maintenance access, roof hatches, utility rooms, and nearby climbable objects |
| Lighting and visibility | Dark areas, glare, blocked sightlines, landscaping issues, and conditions that reduce deterrence or monitoring |
| Public, visitor, and delivery routes | Whether different user groups are clearly directed, separated where needed, and prevented from entering restricted areas |
Review entry points and circulation paths
A checklist will show you all the areas around a building where people or cars can go, leave, or drive through. Those places include: main entrances, employee entrances, fire exits, loading docks, service entrance doors, garage door openings, utility access points, roof hatches, windows, and temporary openings created during construction or repair work.
Some of the questions to ask for possible entry points, as well as circulation, include:
- Are exterior doors secured properly?
- Are loading docks left open during the operation of moving goods in and out?
- Are there any emergency exit alarms that allow someone to egress safely while still setting off an alarm?
- Are windows, roof hatches, and utility areas secure from unauthorized entry?
- Are shipping and receiving employee routes separated from visitor routes where needed?
Check lighting, visibility, and environmental design
In addition to simply evaluating whether there is sufficient lighting to make the exterior of the property safe (e.g., parking lots and sidewalks, entry points, gates, service areas, loading and unloading zones, and other avenues of approach), the checklist should also evaluate whether the lighting can be effectively used at night, during inclement weather, and in different seasons.
Organizations should cover the basic principles of Crime Prevention Through Environmental Design (CPTED) in the evaluation. CPTED emphasizes the design of the physical environment to facilitate easily recognizable movement and reduce opportunities for illegal activity by enabling easy detection of suspicious behavior. The question becomes whether hiding places create blind spots, whether lighting creates dark areas or glare, whether signage directs visitors to permitted routes of access, and whether boundaries between public, employee-only, and restricted areas are adequately defined.
Access and monitoring readiness
The physical security checklist must also ensure that your badges are being correctly granted access, consistently monitored for unauthorized access, regularly reviewed for incorrect granting of access, and have the ability to be retrieved for audit or investigation purposes (i.e. you should be able to answer "who had access to your facility", "what occurred during their time of access", "when did the event take place", and "how can you prove this"?).
Confirm access reviews and revocation processes
A strong access rights checklist should include an evaluation of whether or not access rights are still accurate when reviewed periodically, as access rights continue accumulating over time from the employee changing jobs or contracts (contractors complete projects), staff rotation (staff such as vendors), or expiration of temporary access rights (temporary access does not get removed).
Items on the access rights review checklist should include confirmation that regular access reviews occur on a defined schedule and that either the manager or the areas of ownership in the organization (e.g., the department manager or a sub-department manager) verify the continued need for that individual's access.
Further, higher-risk areas require more frequent reviews than general office space. The review should include identifying orphaned badging, inactive user accounts, duplicate credentials, shared credentials, and unauthorized permissions (those inconsistent with the individual's current job description).
Verify evidence retrieval and retention
Monitoring and access control systems have significant value only if they enable data retrieval when needed. The checklist should determine whether personnel can promptly locate and export video clips, access logs, alarm records, visitor logs, and any other associated evidence.
The checklist should also allow for the confirmation of retention requirements. Various retention periods apply to different types of records based on business needs, legal requirements, insurance coverage requirements, internal policies, and local privacy laws.
Security device health and lifecycle
A physical security checklist must confirm that every authenticated and connected security device has been accurately recorded into the organization's inventory. Records must specify device type, location, device owner, vendor information, device model, firmware version, credential and certificate management, connectivity status, and device maintenance responsibilities.
Check operational health and performance
The checklist should review uptime, connectivity, storage status, recurring faults, and other operational indicators that show whether devices are ready to support security operations. A centralized device health dashboard can make these checks easier and show them in one place.
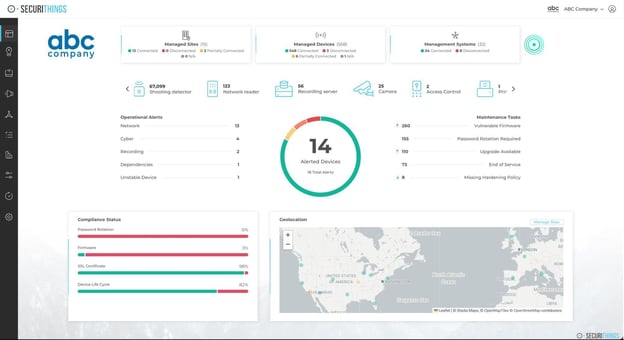
An operational dashboard showing device health, alerts, maintenance tasks, and compliance status (Source)
Organizations should conduct regular reliability tests on devices such as cameras (which are a common physical security concern), readers, sensors, and recorders. If any of these items have only been documented on paper and are unable to connect to a network, intermittently function, or experience frequent problems, they can negatively impact an organization's overall security strategy.
Incident response and employee preparedness
Physical security checklists should include evaluating whether individuals are familiar with proper procedures. Strong controls can certainly help prevent negative consequences.
Review response procedures and escalation paths
Written procedures should specify to whom an alert is sent, who is responsible for verifying that the incident occurred, who will communicate with site staff or emergency services, and who will document the incident.
The contact lists used to establish escalation paths can become outdated as employees' roles change, vendors change their support teams, or sites change their hours of operation. Checklist validation must ensure that emergency contacts, security management, facilities contacts, IT support, local management, and appropriate vendors can be contacted as needed.
When applicable, integration with an organization's HR or identity systems can minimize the need for manual updates of access lists, contact information, and role-based responsibilities when employees join, leave, or change roles within the organization.
Prepare for likely incident scenarios
Checklists should indicate if response playbooks exist for the most likely or most serious threats which include but are not limited to: intrusion, force entry through the doors, suspicious activity in or around the building, workplace violence, theft of the facility, vandalism of the facility, medical emergency at the facility, fire at the facility, severe weather affecting the facility, protest action at the facility, loss of power or water supply affecting site security.
Incident response playbooks must provide the users with a simple guide to recognize the event, escalate it appropriately to the necessary people, ensure the safety of the personnel involved, preserve evidence of the incident, and restore normal operations following the completion of the incident response.
Train employees on everyday security responsibilities
Organizations should typically have physical security checklist items to verify that employees fully understand how to utilize their badge, what procedures should be followed when letting visitors access a building, how they need to escort their visitors once inside the building, the rules regarding restricted areas, how and when to report suspicious activity, and what actions should be taken in an emergency.
Training should also include information on behaviors that could pose a risk to others, such as tailgating, propping doors open, sharing credentials with others, losing a badge, leaving visitors unattended in a building, and not reporting suspicious behavior. Using drills, tabletop simulations, and short refresher training can provide insight into whether staff understand their job functions and whether policies or procedures will work in real-life conditions.
Remediation and continuous improvement
Just because a physical security checklist has documented its findings is not the end of its usefulness; the real value lies in what happens afterward - how gaps identified on the physical security checklist have been prioritized, assigned, corrected, verified, and ultimately utilized to improve the overall physical security program results moving forward.
Prioritize findings by risk and impact
The urgency of each checklist item differs. For example, organizations may identify burnt-out exterior lights, outdated visitor entry procedures, offline cameras, and unreturned access credentials in the same review. However, they do not present the same level of risk.
The checklist process assists teams in prioritizing findings based on their identified impact to the business, safety to personnel, regulatory compliance, criticality to the site, and the likelihood of a threat actor exploiting the issue. Therefore, the identified high-severity risks should be fast-tracked, while the lower-risk items will be planned as part of normal maintenance or ongoing program improvements.
Assign ownership and deadlines
Findings should have an owner accountable for addressing them. Otherwise, findings could be flagged but go unmitigated for extended periods. Therefore, organizations need to ensure every finding or issue is assigned an owner, a due date, a status, and the evidence needed for closure. Ownership could be assigned to security, facility, IT, HR, compliance, the site manager, or a third-party vendor, depending on the specific finding or issue.
Assigning ownership solves two problems: gaps in which there is no ownership and thereby no closure, and reduces the gaps that could be caused by a lack of clarity, for example, which issues are open, which items are delayed, or what items are dependent on budget, vendor support, or operational change.
Identify recurring issues and root causes
If similar issues continue to recur across multiple locations within an organization, there are most likely one or more underlying problems related to policies, training, vendors, device lifecycle planning, other maintenance practices, or owner responsibility.
Examples include: door problems being identified multiple times could indicate that the equipment is poorly maintained; frequent violations in visitor processing may indicate that the policy or procedures are not clear or that the staff was not trained adequately; and frequent outages of devices could indicate that the devices were operating well past their recommended lifespan, or that there is no consistent centralized monitoring of those devices. The purpose of the checklist is to help the team recognize these trends and address the root causes, so they no longer have to fix the same problem repeatedly.
Use findings to improve planning and reporting
The results of a physical security checklist can assist security leaders with developing budget plans, justifying modernization projects, reviewing and updating security policies, evaluating vendor performance, and providing status updates about the severity of the program to executive leadership.
Data collected from checklists can show whether the security program is progressing or improving through metrics such as the number of open finds by risk type, the average time to remediate each item, the number of recurring finds per site, compliance exceptions, device-specific finds, and overdue corrective actions.
The ability for a team to centralize all their device data, alerts, maintenance history, and evidence of compliance can also facilitate the transition from static checklist review processes to ongoing monitoring, especially in larger, more distributed, or device-rich environments, through platforms like SecuriThings.
Conclusion
The best way for an organization to use a physical security checklist is to help them determine how well their controls actually work in an operational setting, rather than simply asking if the controls exist. Quality physical security checklists are customized to address a site's real-world risks, physical layout, access requirements, monitoring processes, device reliability, incident readiness, and the overall remediation process.
Organizations must move beyond simply conducting static inspections on a per-lot basis and manually tracking inspections. Security teams need a repeatable process for identifying gaps, ranking fixes, documenting evidence, and enhancing their overall control measures, as security facilities, threat levels, technologies, and compliance regulations continue to change.
For organizations with multiple locations or large quantities of connected security devices, this process is critical. Platforms such as SecuriThings can assist organizations in achieving this by centralizing device inventory, monitoring system health, configuring visibility, managing lifecycle data, alerting on issues, and providing compliance-related data. These capabilities enable security personnel to turn the findings of their physical security checklist into continuous oversight and accelerate remediation, thereby making organizational physical security programs more stable, measurable, and scalable.